So below I describe to have a test environment setup for cassandra. (Whats cassandra? google it dude)
What you will need
1. Virtualbox to create your VMs
2. An ISO for Ubuntu 13.04 (12.04 seems to have issues with the cassandra install)
3. About 10 GB of Disc space
4. Oracle Java VM which is the recommended flavor of Java
5. An SSH client, if you want to copy paste commands from this page.
I am assuming you are on a windows system, on which you are installing VirtualBox.
Now to get started:
1. Download and Install Virtual Box https://www.virtualbox.org/
2. Download the ISO from http://releases.ubuntu.com/13.04/ and pick a 32 bit or 64 bit server image
3. Install Ubuntu 13.04, dont forget to go to settings and use the ISO as the disk to load from and the install will start
4. During the final steps of the install make sure to Install SSH.
Getting Java from the oracle site.
Step One: Now since you can’t get Ubuntu to download the Java install packages for this version, we will download it in windows. Below are the links to a download the 32 bit and 64 bit versions off the Oracle Java VM
32 bit:
http://download.oracle.com/otn/java/jdk/6u45-b06/jdk-6u45-linux-i586.bin
64bit:
http://download.oracle.com/otn/java/jdk/6u45-b06/jdk-6u45-linux-x64.bin
PS:You really need to register with the oracle site before you can proceed that the download.
Step Two: So you will need an FTP server to get Java into the VM. And that is what we are going to do next. We are going to Install Pro FTP which is a commonly used FTP service.
1. sudo apt-get install proftpd
During Installation please chose standalone option.
2. Open the config file
sudo nano /etc/proftpd/proftpd.conf
3. Change the Name of the server to your hostname and Uncomment the Line which says Default Root.
ServerName “example.com”
# Use this to jail all users in their homes DefaultRoot
4. sudo service proftpd restart
5. Now with and FTP client you can access to the server using the IP address of your VM. So if you login with your ID and uploaded the file, then you can find the java file in the home folder of the user who you used to login.
Step Three: Now you have the Java Files and we can start with your home folder. Lets Setup Java First (need to SSH into the VM first else you need to type in all the stuff below into your VM command prompt.)
1. mkdir ~/temp
cd ~/temp
2. chmod +x jdk-6u45-linux-x64.bin
sh jdk-6u45-linux-x64.bin
3. sudo mkdir /usr/local/java
sudo mv jdk1.6.0_45/ /usr/local/java/
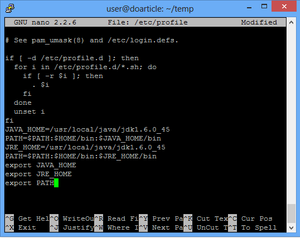
4. To make it the default Java VM on your VPS, add these lines to the /etc/profile file: by using
sudo nano /etc/profile
and pasting the
JAVA_HOME=/usr/local/java/jdk1.6.0_45
PATH=$PATH:$HOME/bin:$JAVA_HOME/bin
JRE_HOME=/usr/local/java/jdk1.6.0_45
PATH=$PATH:$HOME/bin:$JRE_HOME/bin
export JAVA_HOME
export JRE_HOME
export PATH

5. After you’ve done this, press CTRL+O to save and CTRL+X to exit. Next, run the following lines so when the command “java” is called, it’s done so by the right VM.
sudo update-alternatives –install “/usr/bin/java” “java” “/usr/local/java/jdk1.6.0_45/bin/java” 1
sudo update-alternatives –install “/usr/bin/javac” “javac” “/usr/local/java/jdk1.6.0_45/bin/javac” 1
sudo update-alternatives –install “/usr/bin/javaws” “javaws” “/usr/local/java/jdk1.6.0_45/bin/javaws” 1
sudo update-alternatives –set java /usr/local/java/jdk1.6.0_45/bin/java
sudo update-alternatives –set javac /usr/local/java/jdk1.6.0_45/bin/javac
sudo update-alternatives –set javaws /usr/local/java/jdk1.6.0_45/bin/javaws
6. Reboot the VM
sudo reboot
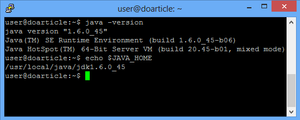
7. When establishing a SSH connection again, test to see if everything is set properly by running:
java -version
echo $JAVA_HOME
if everything is ok you will see something like the below:

Step four: Installing Cassandra
1. cd ~/temp
wget http://www.us.apache.org/dist/cassandra/2.0.7/apache-cassandra-2.0.7-bin.tar.gz
tar -xvzf apache-cassandra-2.0.7-bin.tar.gz
mv apache-cassandra-2.0.7 ~/cassandra
2. Next, make sure that the folders Cassandra accesses, such as the log folder, exists and that Cassandra has the right to write on it:
sudo mkdir /var/lib/cassandra
sudo mkdir /var/log/cassandra
sudo chown -R $USER:$GROUP /var/lib/cassandra
sudo chown -R $USER:$GROUP /var/log/cassandra
3. Now set Cassandra’s variables by running:
export CASSANDRA_HOME=~/cassandra
export PATH=$PATH:$CASSANDRA_HOME/bin
4. You’re going to need to configure Cassandra’s per-thread stack size to a larger one than default. Do so by running:
nano ~/cassandra/conf/cassandra-env.sh
and scrolling down to the line that says:
JVM_OPTS=”$JVM_OPTS -Xss180k”
and changing it to:
JVM_OPTS=”$JVM_OPTS -Xss280k”
Save and Exit nano.
Step five: Running Cassandra
1. To run a single-node test cluster of Cassandra, you aren’t going to need to change anything on the cassandra.yaml file. Simply run:
sudo sh ~/cassandra/bin/cassandra
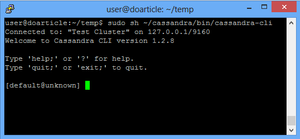
sudo sh ~/cassandra/bin/cassandra-cli
or
sudo sh ~/cassandra/bin/cqlsh
and if it says “Connected to: ‘Test Cluster'” as it does on the image below, you are now running your single-node cluster.

And thats it you have a working single node test cluster for Cassandra.
You can also follow more on what are the commands to try out etc at the Cassandra Wiki:
https://wiki.apache.org/cassandra/GettingStarted
http://www.datastax.com/documentation/cql/3.0/cql/aboutCQL.html
